DIY-ing (and a cautionary tale)

I love doing things myself. It makes me feel capable and I get a real sense of satisfaction and achievement from it. When I was teaching Prep, many years ago, my classroom had electric blinds on the outside of the window. We had a recurring issue where one of the wires was loose and the switch for the blind stopped working. Each time it happened we had to get an electrician in. I became really tired of having to wait for the electrician to come, so when he turned up, I surreptitiously watched what he did from my desk. It was a very simple matter and it took about three seconds to correct the problem. So the next time it happened, I took off the switch plate and did what I saw the electrician do. The only difference between what he did and what I did was that I got a teeny tiny little electric shock. When I got myself back together, I put the plate back on and tested out my blinds. They worked. When it happened again, I told the principal and she called the electrician and the whole cycle began again. The moral of the story? DIY is good, but don’t DIY electrical work. That is dumb and you could die. Be patient and leave it to a professional.

Something that I feel great about doing myself (and that isn’t going to result in me getting electrocuted) is making my own food. I love to cook, and I love to make things from scratch. I’m learning to love growing my own vegetables and I’m trying hard to tolerate my chickens. I definitely don’t love my chickens. One of them attacked me when I went in to feed them yesterday and I am still dirty on her about it. They are a both a bit feral.

Today, after 20 days of fermentation, I transferred my Indian-style kimchi* into jars to go in the fridge.

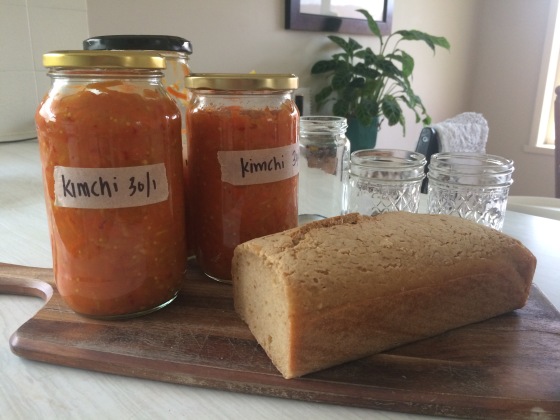
I love this stuff. I have it with scrambled eggs and it makes the eggs so much more interesting. It’s great for the gut, super cheap and super easy to make. When I was working I used to buy it, but a jar like this will set you back anywhere from $7.95 to $13.95 in the shops. I made three and half jars and I think it cost me about $5 in total for the ingredients. I use this recipe and I use this fermenting crock that my awesome Dad gave me for Christmas.

I’ve also started making my own gluten free sourdough (using a recipe from the River Cottage Gluten Free Cookbook). The jars at the back are for Augie’s pumpkin, carrot and quinoa puree that was bubbling away on the stove when I took the photo.

So there you have it. Today’s food DIY, no electric shocks, only deliciousness. Money saving, health promoting and hugely satisfying.

What is your favourite food DIY?

*Now don’t get all mad about me calling it kimchi. I know it’s not legit Korean kimchi. That’s on the cards soon. I just don’t know what else to call it. Feel free to suggest an alternative name if you wish.

Fig and Lemon Balls

Today is a cooking kind of day.  It’s blustery, rainy and cool outside, I have the day off (because it is school holidays!) and there is not much I need to do. Perfect for firing up the oven and turning some ingredients into delicious meals and snacks.

So far I have made skinless sausages (pork, fennel and thyme), roasted cauliflower, lemon and fig balls and coffee-chocolate balls. Still going is the slow cooked beef and sweet potato stew (in the oven), roasted pumpkin and beef jerky. Up next is grain-free crackers and some pumpkin hommus.

I just wanted to quickly share the recipe for the fig and lemon balls because I just created it, and it is pretty good. I had an Emma and Tom’s Fig and Lemon bar a while ago, and it was ok …but I thought I could do better. So I did.

– – –

Fig and Lemon Balls

20130926-142325.jpg

Ingredients

1/2 cup of almonds

6-8 whole dried figs, depending on consistency of the mix

The juice and zest of a small lemon

Method

Put the almonds into the food processor and process until they are in tiny, even chunks. Take the almonds out and put the figs, lemon juice and zest in. Process for a bit, then add in the almonds. Process until it is of an even consistency.

If it is too dry, add another fig and some more lemon juice. If it is too wet, add some extra almonds. You might need to tweak this according to the size of your lemons and figs, but it will taste good either way. The mix shouldn’t be too sticky, it should hold together and mold nicely when pressed.

Roll the mix into balls and store in a container or a jar in the refrigerator.

My mix made about 10 but it depends on the size you make your balls.

– – –

And now to the worst part of having a fun time making a mess in the kitchen – cleaning up.

It’s A Cookie Kind Of Day

It’s miserable outside. Drizzly, cold and grey. When the weather is like this I crave three things – hot drinks, good books and fresh-out-of-the-oven biscuits. I must have been preparing for this subconsciously – I absentmindedly picked up some organic dark chocolate chips while running the gauntlet that is Terra Madre on a Saturday morning. So when the longing for a warm baked sweetie knocked on the door of my brain, I was ready.

I waded through about a zillion websites, trying to find a grain-free, low-sugar recipe that didn’t look like balls. It took a while. Just when I thought I’d found a good one it would include something completely whack or the comments would annihilate the recipe and it’s maker.

Eventually, I found one that sounded pretty good and tried it out. You can find it here. I made a few changes (added extra choc chips; halved the recipe because I WILL eat that many cookies if they are around; subbed coconut sugar for palm sugar and cut it by a half as the coconut flour I use is quite sweet already) and they came out great … although I was not paying attention towards the end, and the cookies came out a little browner than I would have liked. But they taste lovely, have a nice texture and are just the way I like my choc-chip cookies – thick with a soft inside and slightly crisp on the outside.

20130720-161352.jpg

Now the heater is on, I have a full tummy and all is well in the world. Happy cookie day!

Lemon and Blueberry Cheesecake

After a delicious dinner of pulled pork and roasted vegetables, Tyson was saying how much he would like a lemony dessert (hint, hint). We argued a bit about making apple crumble – I really wanted to try out a pie or tart base and he just wanted the usual crumble we often eat for breakfast. BORING.

At the same time, we turned to each other and said ‘Don’t we have some cream cheese in the fridge?’

It was a bit weird. So we took it as a sign. Lemon cheesecake all around. I made one, loosely based on this recipe.

My normal recipe disclaimer applies – this is how I made it. I’m not a recipe tester or pastry chef, and I’m not saying this recipe is perfect. It might not work for you. It might be too dry, or too moist, or too crumbly. You might think it tastes like crap. I made it and I liked it and this is how it was done.

Filling

250g full fat cream cheese

3 teaspoons of honey

1 egg

zest and juice of one lemon

blueberries

Crust

120g almond meal

70g melted butter

Method

Put the ingredients for the filling (except for the blueberries) into a food processor and blend until smooth. Taste it, and add more honey or more lemon as you like. Go nuts and add some vanilla if it makes you happy.

Mix the almond meal into the butter until it makes a thick paste but is not too dry. If it is too dry, add more butter. If it is too wet, add more almond meal. Press into your cheesecake receptacle (I used a tart case) all the way to the edges.

Pour the filling onto the base and spread out evenly. Try not to eat too much of the filling mix or your cheesecake will be too skinny.

OLYMPUS DIGITAL CAMERA

Artfully arrange the blueberries onto the top of the filling.

Bake at 180 degrees until it looks ready, light brown around the edges but not burnt. Mine took about 45 minutes.

OLYMPUS DIGITAL CAMERA

While the cheesecake is baking, lick every utensil you used to move that filling around, then use a spatula to scrape out the last tiny bits of filling that are in the food processor and lick that too. Don’t be a clown and try to lick the blades of the food processor, it will only end in tears. That’s how good the filling should taste.

Here is the hardest part. Once it is out of the oven, you are going to have to wait for it to cool. If you don’t, the base will crumble and the filling will be too gooey. It’s going to need to spend some time in the fridge. When it is cool and set, it is ready to eat. Enjoy!

cheesecake slice

Cake For Dinner

It’s Wednesday, I’m more than halfway through my working week (Did I tell you that I am working full time for the rest of this term? Well, I am. And it’s fine!) and I thought it might be a good time to give you an update on my progress with the Perfect Health Diet, amongst other things.

What’s working?

– The eight hour window for eating. Most days it’s down to the wire, and tonight was a tiny bit over, but DUDE. I had a banana loaf baking in the oven. As if I’m not going to wait until it’s ready to be eaten.

– The carbs. Tonight I ate a bowl of chicken broth with rice noodles before CrossFit, plus a couple of rice cakes with a bit of butter (a lot of butter) and I felt great while I was working out. My energy seems to be staying steady (I was a bit worried that the carbs would cause spikes in my blood sugar and leave me feeling flat and craving more carbs) and I’m generally feeling good.

What’s not working?

– The +25%/-25% rule for workout and non workout days. I just haven’t really figured out my baseline, so I eat when I’m hungry until I don’t feel hungry anymore. The first two days I ate about the same amount, but today I was ravenous and ate a lot more than usual. I guess this is one of those things that will take time to work out.

– No screen time within two hours of bed. It’s kind of working, I suppose, and I am getting a lot done in those two hours. I have cheated a little bit and made my laptop an exception – I have f.lux installed so that I don’t get too much blue light, and I don’t watch movies or anything. I just read a bit and do some writing or some work, like tonight.

I’m generally feeling good. The last 24 hours have been great, with lots of fun and exciting things happening. There was a package for Tyson at the front door when I came home from work, so I brought it in and forgot about it. Turns out it was a late birthday present for me, and now I am the proud owner of a ‘Best Wife Ever’ mug. Sweet AND accurate.

Continue reading

Lazy Saturday

This morning was a nice one. I had a great time at Crossfit doing a fun partner WOD with lots of deadlifts (my favourite!), hit the greengrocers, took Louis (our dog) for a big walk, played around on the blog … but now it is time to get serious. I have a heap of vegetables, two kilograms of stewing beef, two kilograms of topside mince and a free range chicken to get sorted, AND it’s Mother’s Day tomorrow, so I need to make a treat to take to afternoon tea with the family.

(This was me at Crossfit. Not. Image via crossfitimpulse.com)

Anyway, silliness aside, my menu for this afternoon looks like this …

Oven Braised Mexican Beef (Nom Nom Paleo)

Hamburger/meatball/meatloaf mix

Steamed vegetables

Chocolate Espresso Cake (Jill Dupleix)

Coconut Macaroons (Elena’s Pantry)

It looks as though my lovely new Mac Mighty knife and my trusty Kitchenaid mixer are going to get a decent workout today. Time to crank the music and get started!

Any suggestions for my cooking playlist?

A few benefits of bone broth.

In the general vernacular “broth” and “stock” are used interchangeably, but as an explanation of terms, a broth is made at home with bones and leftovers and a stock is a strict recipe used in commercial kitchens to maintain consistency. I’m talking about broth, mainly because once you understand the health benefits, how you flavour it is up to you.

Try to get the best bones you can. If you are going to go to the trouble of making a broth make sure you get healthy bones – organic grass-fed are the best. Yes, you can buy bones, you just have to ask at the butcher. Buying bones is an extra step, another hurdle created by the modern culture of pre-portioned, over-packaged convenience foods. In the good old days, people would buy meat on the bone and use it all to make stock, broth, soups and sauces, so as not to waste anything (and reap the health benefits on the side). I know it may seem crazy, but the best things don’t come easy.

It’s delicious.

Usually that’s enough for me to advocate the consumption of real food, but in this case, the further I look into bone broth and the more I experiment with drinking it, the more I realise how amazing it is. You can make your broth from all types of bones including chicken, fish, veal, beef, lamb and venison (the list goes on). We generally stick to chicken and beef. Adding different flavours to the broth also keeps it interesting (like Pho spices, Thai hot and sour) although we generally stick to the classic method, allowing us to gain a greater appreciation and understanding of how different bone tastes.

Broth makes your joints feel smooth.

I try my best to not take any supplements. But when I do, it is because I’m experimenting with an increased dose of something, and if I’m getting results from it, I’ll look for it in real food. The beauty of bone broth is that it contains so many vitamins and minerals that it’s a one stop shop. In particular – glucosamine. Ever heard the expression ‘you are what you eat’? By slowly simmering the bones you are releasing glucosamine which is crucial for collagen health in your ligaments, tendons and the ends of your bones.

It’s nutritious.

Sally Fallon writes in Nourishing Traditions (1999): “Properly prepared, meat stocks are extremely nutritious, containing the minerals of bone, cartilage, marrow and vegetables as electrolytes, a form that is easy to assimilate. Acidic wine or vinegar added during cooking helps to draw minerals, particularly calcium, magnesium and potassium, into the broth.” Basically, because it’s a liquid form is is easily absorbed by your body and keeps you hydrated.

There many more health benefits to drinking bone broth, I’ve only listed a few that important to me. After some experimenting I’ve found that the best time for me to have a cup is about half an hour before Crossfit. The key is making enough to last a week or two and not over doing it, one cup is enough per day. If you want to find out why you shouldn’t drink too much Paul Jaminet writes on the topic in “Perfect Health Diet” (2012).

How to make beef broth.

First buy enough bones to fill the largest pot you have. We generally buy 3kg.

Lay the bones out on trays and roast in the oven, about 180 degrees for about 1 hour (maybe longer, you want them brown all over but not burnt).

Raw Bones

Peel, wash and chop carrots, celery and onion and sauté in the pot you are going to use for the broth. While the bones are in the oven.

IMG_2419

Next add one head of garlic, some thyme, peppercorns, bay leaf and a couple of pinches of salt. Sauté.

IMG_2421IMG_2420

Add about half a bottle of red wine and let it reduce to about half or a third.

IMG_2422

Add your roasted beef bones and a couple of pigs trotters (for a little extra gelatine and flavour).

IMG_2423

Fill the pot with water and bring to a fast simmer. Turn your broth down to low and let it slowly simmer for somewhere between 42-72 hours. Keep topping up the pot so the bones are always covered and it doesn’t reduce too much. Take the broth off the stove and strain into a bowl, let cool on the bench for a while (so it doesn’t bring the temperature of your fridge up) then put it in the fridge. This allows the fat to rise to the top and set, this is so you can pick it off easily and throw it away or keep it for roasting potatoes.

IMG_2428

From here you may need to freeze some, but in our house there’s not much point.

Very Important: When you are ready to drink your broth you’ll need to add salt. I just heat up a cup in the microwave and add salt to taste. After a while you’ll know if it’s right or not.

If you want any direction on how to make variations or soups just leave a comment and I’ll get back to you.

A few notes on breakfast…

The best advice that I can offer for breakfast comes from Tim Ferriss’ ‘The 4-Hour Body’.  And it is ’30 grams of protein within 30 minutes of waking’.  I have been following this rule almost religiously since 2010 and it works.

First of all, it forces you to eat breakfast straight away, you get hungry for lunch earlier (I normally have two lunches) and then hungry for dinner at a reasonable hour.  Therefore, you’re not going to bed feeling full and bloated (and all of that unused energy turing into fat while you sleep).  The best side effect of this rule is WAKING UP HUNGRY!  This sensation is very primal and something I missed out on for many years (working late and grazing all day as a chef is not beneficial for your health).  And if I do fall into old habits for a while, I’ll fast for a day, wake up and eat breakfast like I never have before.  It is amazing, experiencing food in a different sort of way.

Secondly, not all calories are equal.  If you take a look at ‘The Zone’ by Barry Sears (1995) or ‘Good Calories, Bad Calories’ by Gary Taubes (2011) one thing is evident – macronutrients (protein, carbohydrates and fat) affect the body’s hormonal balance in different ways.  Ferriss puts it quite simply – ‘Eating at least 40% of your breakfast calories as protein will decrease carb impulses and promote a negative fat balance.’

So this bring us to what I actually eat.  Daily.

Most days I eat the same things, or similar.  Just mix and match with whatever is on hand.  I try to have blanched broccoli or cabbage in the fridge all the time.  Make the largest portion of your meal vegetables (low carbohydrate), second largest, protein, then fat.  This way you are eating the most amount of calories as protein but getting the substance from a butt-load of low carb vegetables and feeling full.  Also balancing the macronutrients will keep your hormones stabilised (Entering the Zone by Gary Taubes).

My regular breakfast is this:  In a pan, fry 1 rasher of bacon, half an onion, garlic (if I can be bothered), dried chilli and a couple pinches of salt.  Add one big handful of cabbage and heat through.  Then two or three scrambled eggs to the same pan.  Done.

IMG_2212 IMG_1983 IMG_0791 IMG_0436

First Lunch:  Similar to breakfast.  Sometimes I eat this for breakfast too.  In a pan I fry off some onion, garlic and bacon in a little olive oil.  Add whatever blanched vegetables I have (broccoli, roast pumpkin, kale, beans etc), heat through and add a little soy sauce.  Put the veg mix in a bowl, add a can of tuna, tabasco, fried shallots and a dollop of home made mayo.

IMG_2236 IMG_1882

Second Lunch:  Soup, chopped salad, leftovers or meat and vegetables.  Whatever I can find really, I just try to balance the carbohydrates, protein and fat.


Beetroot Love (and a recipe!)

I didn’t get to post about last Sunday’s foodstorm. Somewhere amongst the shopping and carting of shopping and chopping and cooking, I did something excruciating to my neck. I don’t know what it was, but MAN it hurt. I am just getting back to normal now, and have almost a full range of motion (for the first two or three days I had to turn my whole body if I wanted to turn my head). Anyway, it was quite similar to the previous food storm, except I roasted lamb instead of pork and I cooked up a big batch of Persian beef stew in the slow cooker.

I did a lot of my shopping at the Flemington Farmers Market, which is on every Sunday at Mount Alexander College. There were plenty of great stalls to choose from, and I ended up getting most of my vegetables and fruit, some delicious cheese, free range eggs and some pork mince and bacon. Everything I got was great, but I was especially taken with the beetroots that I bought from the Spring Creek Organics stall.

I peeled and cut them, then roasted them in the oven until they were soft.

OLYMPUS DIGITAL CAMERA

So pretty!

OLYMPUS DIGITAL CAMERA

I put half away for lunches, and turned the other half into the easiest, most delicious beetroot dip you have ever seen.

♥♥♥

Beetroot Dip

2 medium beetroots

2 tablespoons full fat greek yoghurt

A couple of sprigs of mint

Salt and pepper

Cut and cube the beetroots, just like I did. Toss them in some olive oil, and roast them in the oven until they are soft when you poke them with a fork.

Put the roasted beetroot into a bowl with the other ingredients, then whizz the whole lot up with a stick mixer until it is smooth-ish.

♥♥♥

That’s it. Told you it was easy. I may or may not have added some lime juice – I honestly can’t remember.

I’ve been eating this on anything I can get my hands on – the cold roast lamb, scrambled eggs, dipping carrot and celery into it, putting it on bits of apple, crumbling a bit of feta cheese on top … it’s that good.