I love doing things myself. It makes me feel capable and I get a real sense of satisfaction and achievement from it. When I was teaching Prep, many years ago, my classroom had electric blinds on the outside of the window. We had a recurring issue where one of the wires was loose and the switch for the blind stopped working. Each time it happened we had to get an electrician in. I became really tired of having to wait for the electrician to come, so when he turned up, I surreptitiously watched what he did from my desk. It was a very simple matter and it took about three seconds to correct the problem. So the next time it happened, I took off the switch plate and did what I saw the electrician do. The only difference between what he did and what I did was that I got a teeny tiny little electric shock. When I got myself back together, I put the plate back on and tested out my blinds. They worked. When it happened again, I told the principal and she called the electrician and the whole cycle began again. The moral of the story? DIY is good, but don’t DIY electrical work. That is dumb and you could die. Be patient and leave it to a professional.
Something that I feel great about doing myself (and that isn’t going to result in me getting electrocuted) is making my own food. I love to cook, and I love to make things from scratch. I’m learning to love growing my own vegetables and I’m trying hard to tolerate my chickens. I definitely don’t love my chickens. One of them attacked me when I went in to feed them yesterday and I am still dirty on her about it. They are a both a bit feral.
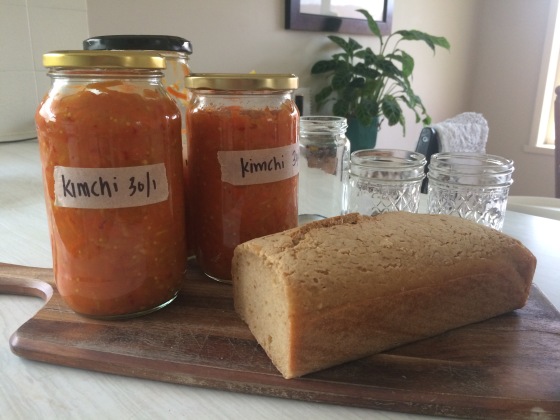
Today, after 20 days of fermentation, I transferred my Indian-style kimchi* into jars to go in the fridge.

I love this stuff. I have it with scrambled eggs and it makes the eggs so much more interesting. It’s great for the gut, super cheap and super easy to make. When I was working I used to buy it, but a jar like this will set you back anywhere from $7.95 to $13.95 in the shops. I made three and half jars and I think it cost me about $5 in total for the ingredients. I use this recipe and I use this fermenting crock that my awesome Dad gave me for Christmas.
I’ve also started making my own gluten free sourdough (using a recipe from the River Cottage Gluten Free Cookbook). The jars at the back are for Augie’s pumpkin, carrot and quinoa puree that was bubbling away on the stove when I took the photo.
So there you have it. Today’s food DIY, no electric shocks, only deliciousness. Money saving, health promoting and hugely satisfying.
What is your favourite food DIY?
*Now don’t get all mad about me calling it kimchi. I know it’s not legit Korean kimchi. That’s on the cards soon. I just don’t know what else to call it. Feel free to suggest an alternative name if you wish.


